Types of Ammunition
Solid Shot
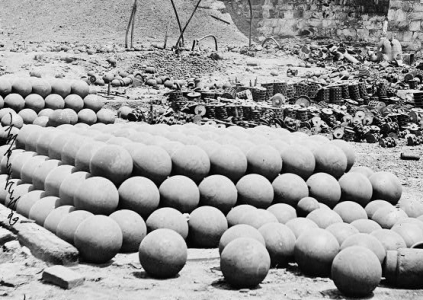
For smoothbores, cast-iron solid shot is the familiar spherical cannonball; for rifles, the elongated projectile is called a “bolt”. Both were useful for counter-battery fire or attacking fortifications; the superior power of the rifle bolt was the technological development that made masonry fortifications obsolete, a fact graphically demonstrated by the ease with which the walls of Fort Pulaski were breached early in the War.
Shell
Shell, as its name implies, is a hollow iron projectile filled with a bursting charge of black powder.
All round shell, and some rifle shell, used a time fuse to ignite the bursting charge.Rifle shells could also use percussion fuses.
Case Shot
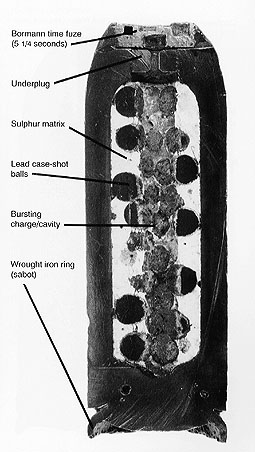
Also called shrapnel or shrapnel shell after its inventor, British artilleryman Henry Shrapnel, case shot was an improvement on the simple shell by the addition of small lead or iron balls to the interior of a thinner-walled projectile. The balls were embedded in a matrix of sulphur or coal-tar. Case shot was designed to explode in the air, so nearly always used time fuses.
Canister
Canister is simply a tinned-iron can full of iron or lead balls packed in sawdust. When fired, the effect is that of a giant shotgun blast. Canister is essentially short-range anti-personnel ammunition.
Grape Shot
Grape Shot is similar in concept to canister, but has fewer and larger balls, held together with iron rings or trussed up with fabric and twine. (The latter is “quilted grape shot”, sometimes referred to as “quilted grape” or “quilted shot”.) It is often erroneously stated that this was purely naval ammunition, but grape was at least occasionally issued to field and foot artillery.
The Mechanisms Of Rifled ammunition.
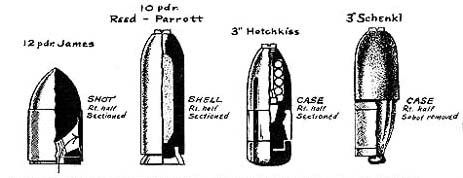
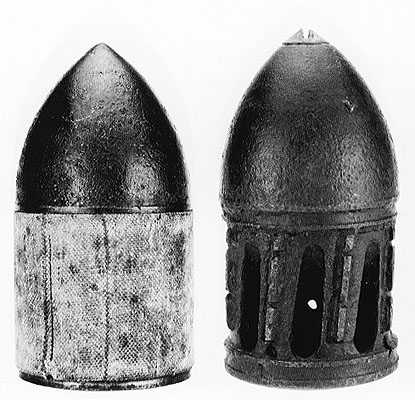
Just as rifled cannon were in an experimental phase at the beginning of the Civil War, so ammunition for those cannon were developed in bewildering variety. Each of the types shown here employed a different method of engaging the rifling on a gun. The James shot allowed gas to pass through slots in the lower part of the projectile, forcing the thin metal sabot to expand outward and engage the rifling. The Read and Parrott designs, which were substantially similar though not identical, relied on a soft metal cup (usually brass or wrought iron) in the base to expand and take the rifling. Hotchkiss ammunition was manufactured in three parts; the upper bolt was separated from the lower base by a lead ring sabot around the exterior. The firing forced the two iron parts together, accordian-like, expanding the intermediate lead ring to engage the rifling. Finally, Shenkl’s ammunition employed a papier-mache sabot over the tapering rear half of the shell; when the explosion forced it forward, it expanded to take the rifling.
Photographs from Melton & Pawl
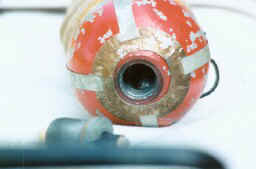
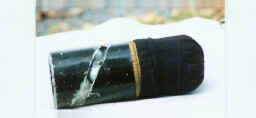
The following table gives more detailed views of a variety of types of ammunition, and is intended to be illustrative rather than exhaustive. All photographs are copyright 1996 Jack W. Melton, from Jack W. Melton and Lawrence E. Pawl, A Guide to Civil War Artillery Projectiles, 1996. The photographs are reproduced here, and the descriptive text adapted from that work, with the gracious permission of the authors. For more information on and a thorough listing of the great variety of artillery ammunition used during the Civil War, we highly recommend visiting Mr. Melton’s site:
“Civil War Artillery – The Projectiles “
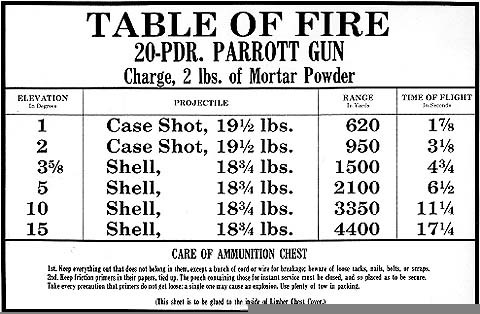
Each model of cannon was equipped with a Table of Fire, which was affixed to the inside of the lid of the limber chest:
The columns show the elevation in degrees, the projectile, the range in yards, and the time of flight in seconds. The lower portion of the chart reads as follows:
Care of the Ammunition Chest
1st. Keep everything out that does not belong in them, except a bunch of cord or wire for breakage; beware of loose tacks, nails, bolts, or scraps.
2nd. Keep friction primers in their papers, tied up. The pouch containing those for instant service must be closed, and so placed as to be secure. Take every precaution that primers to not get loose; a single may cause an explosion. Use plenty of tow in packing.
(This sheet is to be glued to the inside of Limber Chest Cover.)
The gunner having determined the range of the target, the men at the limber chest would give him the elevation, to be used in aiming the piece, and use the time of flight given by the table to set the fuses. A certain amount of mathematical skill was expected in order to extrapolate from the ranges given in the table.
With few exceptions (such as the mountain howitzer) the limber chest was the same size for all field pieces, and the amount of ammunition it could hold varied with the caliber and rifling. A limber chest could hold 50 rounds of ammunition for a six-pounder; with its four chests (two on the caisson and one on each limber), each six-pounder gun carried 200 rounds. The same chest would only hold 32 rounds for a 12-pounder. By regulation, each chest included some of each type of ammunition used by the piece, although field practice might vary this. (The numbers given are for fixed ammunition, in which the shot or shell is strapped to a wooden sabot, with the powder bag affixed, so that the ammunition can be loaded in a single movement. This was the typical, but not universal practice during the War.)
Fuses
Solid shot, canister and grape all operate on the same principle as musket fire; the projectiles are simply flung at the enemy by exploding a large charge of powder behind them. Shell and case shot are somewhat more complex, being designed to explode at or near the target. To accomplish this, some sort of fuse is necessary. (The word was typically spelled “fuze” during the period.) The fuses used by the artillery in the Civil War were of two very basic types: time fuses, which burn slowly enough to ignite the main charge of the projectile after a number of seconds, and percussion fuses, which explode on impact.
Time Fuses
 |
The oldest and simplest form of time fuse was a tapering cylinder of wood (left), hollowed almost to the point and packed with a composition of mealed powder moistened with whisky or alcohol. When dry, the rate of burning would be determined by experiment, and marked on the fuses packed with that lot. The fuse, marked in tenths of inches, would be cut with a fuse saw to the length necessary to burn for the desired period of time. The rate of burning for a composition packed into the tube was unreliable, however, because the packing would result in uneven stratification of the powder.
The paper fuse of substantially similar form overcame this difficulty because it could be packed longitudinally before being wrapped. They could be cut to length with a sharp knife, and were inserted into a wooden fuse plug in the hole of the shell. (More sophisticated fuses might use a metal fuse plug that would screw into the fuse-hole of the shell.) Paper fuses were color-coded: yellow burned 5 seconds to the inch, green 7, and blue 10. The Union ordnance department decreed that only the Frankfort Arsenal would manufacture paper fuses, in order to ensure a uniform product. The Confederate ordnance bureau could not afford this luxury, and the unreliability of their fuses, in comparison to their Union counterparts, was a regular source of frustration to the Confederate artillerymen. Both wooden and paper fuses continued to suffer from the defect that the shocks of field use tended to break up the solid composition, allowing fire to penetrate too quickly to the main charge.
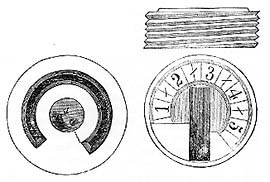 |
As in so many areas, however, the War stimulated experimentation. This relatively simple technology was soon supplemented by a large variety of time fuses. All continued to be based on the concept of a substance (powder or quickmatch) that would burn at a known rate. The most successful of these was the Bormann fuse (left), which is worth a detailed description because so many other fuse types were based upon its design. A Belgian state secret for many years, it leaked out in the 1850’s and achieved instant popularity as an easily-manufactured, reliable, and waterproof fuse.
The form of the Bormann was quite simple. Within a squat threaded cylinder of metal was a groove running around the circumference; a channel at one end of the groove led to the center of the fuse, which was in turn perforated to communicate with the charge inside the shell. The top of the fuse was sealed with a thin sheet of tin, graduated as shown in seconds. The cannoneer at the limber chest would screw the fuse into the shell and punch a hole in the fuse at the desired number of seconds. The Bormann fuse and its derivatives (such as the Baden and Breithaupt fuses) were very popular with artillerists by the time of the War, but the expense and time of manufacture made the continued use of paper and even wooden fuses necessary.
All time fuses were ignited by the main charge behind the projectile; the necessary windage for the piece would allow flames to lick forward around the shell and light the fuse. By the use of a sabot, the gunners could be sure to load the ammunition with the fuse facing forward, else the main charge might force the fuse into the shell and explode it prematurely, with potentially disastrous consequences.
Percussion Fuses
As the name implies, percussion fuses explode on impact. As a very general rule, they employ some sort of spring or slider mechanism to arm the ammunition by inertia, throwing a plunger to the rear upon firing and then allowing it to fall against a percussion cap upon striking. Many patents for percussion fuses were issued during the period of the War, but none were used extensively, being limited to specialized purposes like destruction of fortifications. Their complex and often delicate construction made them unsuitable for regular field use, and there was always the concern that their mechanisms would become armed during the transportation and loading.
Friction Primers
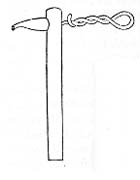 |
The age of the linstock and quill had not quite ended by the time of the Civil War – Gibbon gives detailed instructions for the manufacture and use of slow-match, quills, and even portfires. However, this cumbersome method of firing had been superseded by the remarkably effective friction primer. The primer consists of a brass tube, open at one end. At the closed end, a small hole of about the same diameter of the tube is drilled to one side, and short length of similar tubing is inserted and soldered into place. Opposite this short length of tubing is a hole to receive the priming wire, which is a length of brass wire with a flattened and serrated end. The short tube is lined with a friction powder similar in composition to the head of a friction match, and the priming wire is inserted through the head of the primer and into the short tube, which is then crimped to hold the end of the serrated wire in place. The long end of the priming wire is twisted into a loop.
The head of the primer is then sealed with shellac, and when dry the main body of the primer is filled with musket powder, the open end being sealed with wax. The resulting product is effectively waterproof, which is one of the signal advantages of the friction primer over the linstock. In use, the primer is simply placed in the vent hole of the piece, with the lanyard hooked to the loop of wire at its head. When the lanyard is pulled, the serrated end of the priming wire ignites the friction composition, which in turn sets off the musket powder in the body of the primer, which flashes down the vent to set off the main charge. The effect is almost instantaneous.
Before the introduction of the friction primer, many pieces were equipped with a lock mechanism to use percussion caps, similar to those used to fire muskets.
Effects of Artillery
A minie ball could do a frightful amount of damage, but the most horrific sights of the battlefield were produced by artillery fire, particularly canister at close range.

